Tuesday, 22 September 2020

WIP: Reposing Finished

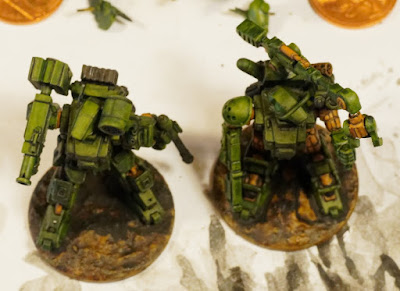
Left to right: standard CASE-2X Dog, CASE-2XC-Mod:2E Command Dog, and CAS-4CP Buster.

After the paint peeled off these models, stripping them back to bare metal effectively meant I'd taken a one step back towards completing this project. Its not as if I don't want to finish them unless they're perfect, though there's some truth in my wanting to make them look as good as possible.

Instead, it's more like I think it would be a shame to waste an opportunity to try and make the most of a bad outcome, as I didn't want to let all the work I had lost bring me down.

So I chose to see it as a second chance to do the best job I can with these classic RAFM miniatures.

The various shots that follow show where I cut the joints when rebuilding the models, using a combination of Kneadite (green stuff) and Milliput.

Green stuff is easier to sculpt when you want organic shapes, but Milliput is better for filing into shape when you want flat surfaces, and parts to be square. But on more than one occasion I mixed them both together, because green stuff can be annoyingly sticky to work with.

The work I carried out included re-sculpting the arm joints on the model on the left, and then rotating the left hand so it sits better with the main gun. 

I also reposed the legs of the other two models. In addition, I rebuilt the torso of the model on the right. I might, if I can figure a way of doing so, make a flexible ammo chute feed for it too.

Doing so would give me more flexibility when pose it for pictures, as now all the arms and the torsos on the models can be moved.

But, I'm pleased at how their stances turned out. I think they look more dynamic now, and it has motivated to get on with painting them – again!

Unfortunately, these shots don't show the work I've done texturing the bases sculpting in foot prints and track marks. The feedback from the first two models I finished  pointed out that the bases were a bit bare. 

I thought the critique was fair. The bases were a bit plain.

I'm not big on fancy bases, but given the amount of work I've put into these I thought I'd give it a go, and see what I could do to raise my game. After all, it can't hurt.

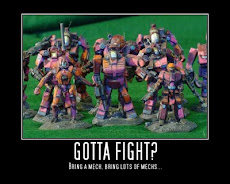
And finally, given this project turned into a labour of love, here's a reminder of what they looked like the first time round. I think I can safely say I've definitely taken them to another level.

As always, thank you all for following my blog. Catch you on the bounce.

Friday, 11 September 2020

Big Little Wars: Post 1 - Gate Walker Battles

After a year that feels like living in the Bad Place, I've started to get some interest back in making models and playing games. I'm still sad to say that I have no mates to play Heavy Gear with, and therefore have little chance of teaching the casual person to play a game I don't fully know how to play.

Also, I'm still struggling still with a lot of self-doubt about my fiction writing. I've gone through a period of stagnation, and at the moment it would be stressful trying to jump back into writing full-time.

So getting back into the saddle too soon might trigger a relapse of my depressive episode.

But writing something would be good for me. So, I have decided that I might try writing a set of rules for the Gate Walker universe setting. If only because it will be easier to teach people to play a new game if I wrote rules.

I may be biased, or deluded, in holding that opinion, but I do have the previous experience of designing game rules from writing OHMU War Machine.

Given the amount of time between the last time I considering writing a set of rules for my setting, it's time to reassess my options. My previous thoughts on the rules centered around updating the command control rules, and revising the available units to reflect my Gate Walker universe.

However, I'm unconvinced that I still want a set of rules that can handle battalion and larger sized combat groups. Also I might need to consider the option of being able to play solo as well. But I do know I want to capture the feel of #RealRobo combat.

I know, I know, what does that even mean?

1. Capture the feeling of future warfare with power armor etc.

2. Detailed enough for squads with support elements to make combined arms platoons.

3. Command and control rules, so the player acts at the level of each squad commander.

The first goal is a bit like being General Haig at the start of WW1. It's like me having to face the challenge of learning how to fight a war where technology has moved the goal posts on what works and what doesn't.

Fortunately, I won't have to put real people through the grinder.

Second, what do I mean by squads?

I'm thinking two to five people or vehicles per unit. A platoon would be three to five squads, so a combined arms platoon would be between ten to 25 infantry or to six to ten vehicles.

Optional off table support will be available to represent assets available to the combined arms platoon like: satellites; artillery, air-support etc.

Finally, I want the command and control rules to be a bit like Chain-of-Command.

Players get dice to roll that generate the number of commands they can give a turn (thinking this could represent limitations from bandwidth, ECM and ECCM that battles generate). But also allow them to focus on what heroes can bring to the action.

That sounds like a reasonable set of goals, but whether I can write a set of rules that other people want to play remains unknown. And now I have to think of a name for them. Please feel free to make comments now, before I start writing.

I'm sure this blog that will make my friend Roger laugh, as he predicted I end up trying to write my own set of wargame rules.

Friday, 4 September 2020

Silver Lining


Allegedly, every cloud has one. I decided to strip another mech, because I chipped it and trying to correct that the problem led to me peeling off a whole chunk of paint. However, looking on the the bright side, I can magnetize the torso, which is an upside.

When I started this conversion I only had one Grizzly, but in the intervening months two more have come my way.

Both of those were in better condition than my original, though still exhibiting casting flaws, and the one thing bugging me about my model was the casting flaw. So, razor saw in hand, I started cutting parts off one of the spare Grizzly's.

I've also taken the opportunity afforded me by breaking the model down into its component parts to clean up what had been hard to reach spots of filler, and make everything look tidier in the process.


Okay, that's a bit of an epic journey for such a small improvement, but that's the way I roll. Okay, that's it until next time. Catch you all on the bounce.

Sunday, 30 August 2020

Catastrophic Delamination


Well that's a first. While blending the paint, I overworked the surface, and the paint delaminated. I tried to fix the problem, but more paint peeled off.

Oops! A very big oops.

Ooh, what a horrid mess I made.

Then I tried to clean the area, but only made it worse. And as you can tell this is a very sad story that ends with me stripping the model back to bare metal.

However the arms turned out well, so there's that to be grateful for. Count your blessings.

Not a brilliantly sharp shot, handheld, but hopefully you can see the blending? And because I knew I was entering uncharted territory, trying out new techniques, I still have the other three models to practice on. I'll try not to overwork the paint and avoid making the same mistake twice.

I see myself rewatching a blending tutorial again, paying closer attention to how to not delaminate the paint.

So that all from my workbench for this time. Catch you on the bounce next time.

Monday, 17 August 2020

An Acquisition & Taking it to the Next Level: 2

Still shading these, and this picture is mostly for record keeping, and illustrating my painting process.

In other news, my beloved bought me this kit.

Didn't realize it was a kit, but no big deal as it will just make the conversion into a Panzer Jäger Cybertank – from my The Last War: World of Drei stories – that much easier.

Yes I have plans. Cue laughter...

Friday, 14 August 2020

Taking it to the Next Level: 1

I've moved my next four conversions forward one more step.

This has been a bit of a journey, learning to put techniques together in different ways, and I'm certainly coming up with a different way of getting to the look that I want.

Refining the process so that next time, hopefully, I will be able to get the unpainted model to finished quicker. But, no guarantee, because art is art.

Saturday, 8 August 2020

OMWB Next Batch WIP Update

A quick update. Dog on the left has had the lining/shadows done. Dog on the right painted with a different shade of green. Picture below, is the same Dog after the ink wash/glaze.

This project is still very much an ongoing learning process as I integrate new techniques into my painting and weathering repertoire. Still several more stages to go.

I have bought some texture products to go back over the bases of my first two models too.

Saturday, 25 July 2020

CAS-3-Mod-1 Portraits

Army Combat Armor Suit Mark 3 Model 1 [click to embiggen].

Okay, here are the first two RAFM conversions painted. 

First up is Espera's CAS-3-Mod-1 Ape carrying on the right arm an M75 80mm lightweight high-velocity recoilless autocannon. The left arm has a M134 GAU-2B/A 7.62mm minigun. Finally, the suit has a shoulder mounted missile launcher carrying 15 rockets.

Though Espera only appears in Strike Dog my assumption is that this is a pretty standard Army Ape suit loadout for a weapons specialist.

Army Combat Armor Suit Mark 1 Model 1EV Engineering Variant [click to embiggen].

Pearson's Ape is a CAS-1-Mod-1EV: engineering variant with a shoulder mounted 100mm mortar for demolition work.

Defense against armor suits is provided by a M26 short-recoil light 20mm autocannon that fires a 20 x 102mm high explosive dual purpose anti-armor (HEDP) warhead with a range of 3 kilometers. The M26 comes with an inbuilt Mk 30 40 x 53mm underbarrel grenade launcher effective out to one kilometer.

In addition, the CAS-1-Mod-1EV carries an M240LC general purpose 7.62mm machine gun.

Tell me what you all think about the paint job on these as I tried out a whole bunch of new techniques. Any suggestions for making them better will be gratefully received.

Thursday, 23 July 2020

OMWB: Painting Six Combat Armour Suits

Taken with my 7-14mm wide angle zoom.

Another post coming to this blog from a veritable flood of creativity. I've started painting these models using my wet palette, which theoretically allows me to blend the paint. So far all I've managed is plain washes for the basic colour.

WIP taken with my 60mm macro.

Still a ways to go with these, which leaves me with a question...

How Much Time Should it Take to Paint a Single Mini?

 Enjoy, catch you all on the bounce.

Monday, 20 July 2020

Mecha Suit Size Comparisons

This is how Dream Pod 9 Gears compare with Takara 1/144th scale VOTOMS. They're pretty similar height, but the Gears are bulkier, which is probably down to being cast in metal.

The Dream Pod 9 models are really nice, and relatively easily customized allowing one to tweak the pose.

With my camera out, I took the opportunity to take a bunch of pictures of my collection of my miniatures from GZG, Dream Pod 9, and RAFM mecha suits.

Everything I've recently painted with a RAFM Gear for comparison and Object 295.